Silvermane's (Steven Cherecwich's) classic guide to Fort Rox, last updated March 2017. Some mechanics, prices, and trap recommendations are dated, but the area's core flow is unchanged. Reproduced here for easier reading.
Contents
- Getting in
- The fort mechanics
- Upgrading the fort
- Night time
- Hunting at night
- Dawn
- New mice
- Loot distribution
- New traps
- Treasure chests & the Heart of the Meteor
- TL;DR for the hopelessly lost
Getting in
Start by going to the Claw Shot City Cartographer and buy the map piece for 25 Fool's Gold. It's an immediate turnaround, so you can travel on the map straight to Fort Rox. Yay! That was easy!
The fort mechanics
You must defend your fort from the vicious attacks of the Night mice. The way to do this is to upgrade your fort, and of course arm different weapons. This area gives us a new HUD with separate sub-HUDs for the upgrades. Those who know the Great Winter Hunt will be familiar with the general mechanics.
In this area, you can use multiple different cheeses to attract different mice. The HUD will recommend Gouda, SB+, a new Crescent Cheese, and Moon Cheese. The importance of these two new cheeses will be discussed in the Night phase — don't bother with them during the day.
The top left shows a Defend Fort button — this is when you're ready to switch to the Night HUD. You get the option to cancel or retreat from Night as you wish.
That blue crystal is mana, and the Activate is for when you build the Mage Tower. This has some uses to help speed through the area, but isn't required by any means.
The black rock is meteorite pieces, and the next two are Howlite and Bloodstone — two new loot drops that are only found during the Night phase, and are used for upgrading your various defences (see the pictures below for requirements and benefits of upgrading).
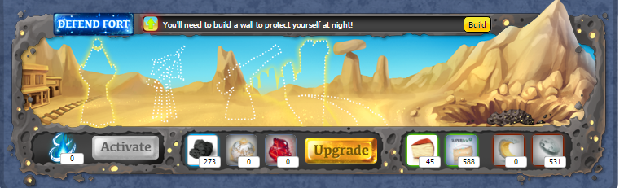
Power play tip — Meteorite Piece (MP) use will be contentious for a while. If you can use Moon Cheese by buying from the marketplace, crafting, or buying a Mouseoleum Champion Kit, then that's great. Meteorite pieces can be obtained from loot drops, or if you're desperate, in the King's Cart for one KC per piece. For now I suggest splitting your supply in half — use half for cheese crafting and half for rebuilding the wall after each run.
Upgrading the fort
The fort has five separate areas you can upgrade: the Wall, Ballista, Cannon, Moat, and Mage Tower. Each one has different attributes that affect your gameplay. The attributes are permanent, so don't be afraid to upgrade whenever possible. To enter the night phase you must build at least a wall, which costs 50 meteorite pieces — gained from loot drops off the Law mice during daytime.
The HUD will light up the Upgrade button during daytime whenever you have enough supplies, so you don't need to be too meticulous about checking the requirements. You can click Upgrade anytime, day or night, to see where you stand on supplies — but note that you can only upgrade during the day!
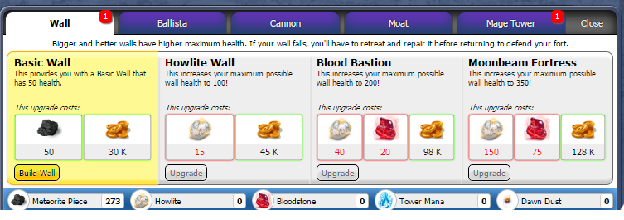
Important tip — upgrading the wall — When you start with the basic wall, you'll notice it takes 50 meteorite pieces to build a 50-health wall. When you upgrade, though, no meteorite pieces are used! Your wall still has 50 health, but you've raised the max to 100. This means you'll need 50 more meteorite pieces to fully heal the wall before you can go into the Night once more. You can enter the night anytime, though, even at 1 health if you really want to.
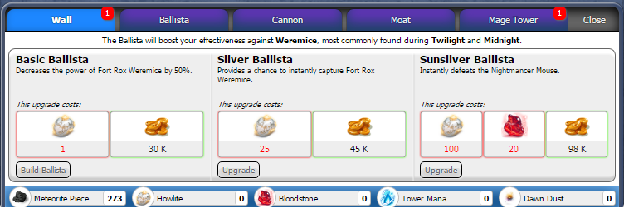
All ballista effects are immediately active. There's no need to do anything other than sit back and reap the benefits of making the Twilight–Midnight areas just a little bit easier.
- Ballista 1 increases your catch rate by approx ×1.5 for Reaper's Perch or similar.
- Ballista 2 gives around a 40–50% chance of automatically catching any Werewolf encountered.
- Ballista 3 automatically catches the Nightmancer mouse, which is encountered approx 5% at Twilight and 10% at Midnight.
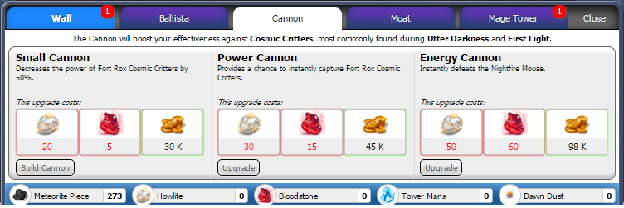
Like the Ballista, there's nothing special to do here other than enjoy the benefits of making the Utter Darkness and First Light areas a bit easier to get through. Nightfire is encountered approx 10% at Utter Darkness and 20–24% at First Light.
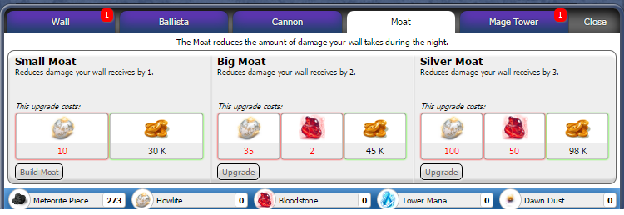
Who doesn't like taking less damage?
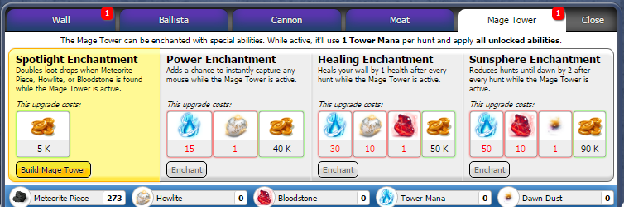
Upon building the Mage Tower you will gain 5 mana. The choice is yours whether to activate it or not. This is similar to the lantern oil mechanic, in that you get double loot drops — and it's also required to upgrade the tower.
Mana can be obtained many ways: you can donate, find it as loot drops, or buy it from the general store with Howlite and Bloodstones. Notice many of the effects are only available when active. Please note the "Sunsphere Enchantment" is a little misleading in its wording — you don't skip two hunts, but rather get one extra hunt (advancing you two total: your regular hunt plus one extra).
Power play tip — Unless you've donated, be cautious about when to activate the tower, as mana drops are scarce. After upgrading, activation abilities stack, so you may decide to activate only when your wall needs healing (it heals in the dark!), or when you need extra loot such as Howlite at Twilight or Bloodstones in First Light.
Donators — First off, thanks for keeping the game free for the rest of us. That said, donating for mana and getting double loot drops will rapidly speed your way through the upgrades, making the whole area easier. Activate it as soon as you're able.
Decision time — upgrade order — Everyone's play style is a little different, but you should start with Wall 1, Mage Tower 1, and then most people do Ballista 1 (and exit night) before Moat 1. From here, the best path is to start with your weapons — you'll need to catch mice to upgrade the rest! So work on your Ballista, then Cannon, before focusing on the higher Walls, Moat, and Tower.
And now some discussion on wall health. The wall starts at a mere 50 health, but by the time you're fully upgraded and have mana to burn, you'll have a wall with 350 health plus enchantments that both prevent damage and heal the wall.
At the beginning of each hunt, your workers try to repair the damage before the attack comes. If you've got the tower activated and your wall isn't at full health, you'll gain one point. Next, as the mice come to attack, they get weakened by crossing the moat and do less damage. A fully upgraded fort that's taken 100 points of damage would look like this:
- Before clicking the horn, it's at 250. Click the horn…
- Tower fixes some damage. Now you're at 251.
- Mice get weakened crossing the moat, and instead of 5 damage only do 3. Now you're at 248.
Night time
Night is a dangerous time! You need to hide behind the walls you've built and wait out 130 attacks (hunts), which progress at the top of the HUD. As long as you capture the mice, the wall will not be damaged. But if you miss…
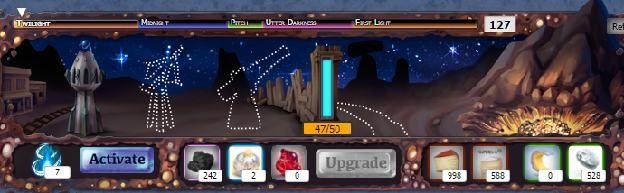
It seems every mouse you fail to catch (FTC) does a minimum of 3 damage, giving you a grey box. If the mouse steals from you, a red box means 5 damage to your wall. The exception is the Battering Ram, which does 15 damage every encounter — that's right, even if you catch him you still take the damage. The only way to avoid the Battering Ram is to use special cheese like Crescent or Moon Cheese (similar to how the Shadow Stalker in the Labyrinth avoids GG).
Of interesting note, a failure to attract (FTA) means no mice show up, and yet your wall still takes 5 damage.
Assuming you don't reach dawn, once your wall has been destroyed you'll pass out unconscious from the assault and wake up to a new day with a damaged wall:
The hordes of mice overran my fort walls, crumbling them to rubble. My fellow hunters found me unconscious near the battlements in the morning.
You'll need to repair the wall — by either spending meteorite pieces or having an upgraded tower — then upgrade any defences and prepare for the next onslaught.
Power play tip — Don't feel like you have to spend the whole night waiting for your wall to be battered down. Go to night time, spend 5 or so hunts collecting Howlite, then leave. You won't have to spend too many (if any!) meteorite pieces to fix your wall, and you'll be able to immediately upgrade your Ballista, which reduces the power of the night mice — fewer FTCs means less damage!
To survive the night, you need to spend 130 hunts during the night to get the Monster of the Meteor to show up. Night is broken into five stages, each with different mice of different power and wall damage — a mechanic we've seen before in the Iceberg.
Hunting at night
Daytime — Length: any. Trap: Law. The daytime mice are busy little worker mice who go around picking up meteorite pieces for you to loot. Nothing much else to say about them — be sure to arm a Law trap!
Twilight — Length: 35 hunts (130–96). Trap: Shadow. This area is mostly werewolves, which drop Howlite, mana, and meteorite pieces. If you FTC one, your wall is hit for 3–5 damage.
A Nightmancer FTC extends the night by 3 hunts, making dawn harder to reach. You cannot go past 130 hunts for the whole night, but you can be pushed back from one stage to an earlier one.
A Battering Ram FTC damages your wall by 15. Ouch! He doesn't like the light, so use Moon/Crescent if you want to avoid him.
Note that leaving the area does not reset the timeline — much like the Iceberg, you'll come back right where you left off.
Power play tip — While Moon Cheese offers a "near perfect" attraction rate, Crescent Cheese is much cheaper, with a reduction in attraction. HornTracker also shows consistently better loot drops when using Moon Cheese (no surprise, since it takes SB to make).
Midnight — Length: 25 hunts (95–70). Trap: Shadow. As you enter Midnight, the mice become a mixture of eight mice weak to Shadow (but normal to Arcane) and four mice weak to Arcane (and normal to Shadow), plus the Battering Ram. My suggestion is to stick with the best Shadow trap you have — the pushback from the Nightmancer is not worth the extra loot from the Gunslinger and Night Watcher.
Pitch Black — Length: 10 hunts (69–60). Trap: Arcane. Upon entering Pitch Black, you'll get a notice telling you to arm Arcane. All the same mice are present, plus three new ones, bringing the mix to eight Shadow and seven Arcane, plus the Battering Ram. The Nightfire mouse now arrives, doing tons of damage compared to the Battering Ram — so the choice is yours: damage or pushback? General community feedback is to switch to Arcane the moment you step into Pitch.
Power play tip — When you miss the Nightmancer (and you will), he can push you out of Pitch and back into Midnight. Watch your trap setup — you'll need to go back to Shadow for a hunt or three.
Decision time — For advanced players with all defences built up, you'll notice the Mage Tower moves you two hunts along the path with each hunt and gives bonus loot. Yet Pitch Black is the shortest section, with loot of all kinds available. To activate, or not? My recommendation is to turn off the tower for those ten hunts — but that's just me. :)
Utter Darkness — Length: 25 hunts (59–36). Trap: Arcane. The mice here are the same as in Pitch Black, but with a population shift towards Nightfire and the more difficult mice in abundance.
First Light — Length: 35 hunts (35–Dawn). Trap: Arcane. With first light, the werewolves finally flee for home, and now there are only Arcane mice around. They're tough, so be prepared for a hard-fought battle to reach the final dawn.
Please make note of that rotten, evil Nightmancer, who pushes you back in time by 3 hunts with each FTC. The hunt counts above are accurate when you first enter Night; they will shift based on how many Nightmancers you miss. He can even push you back into a different timeframe, so be careful of your trap setup if you're pushed between Pitch and Twilight!
One of the difficult decisions is when to stay on the Night side, and when to cut your losses and run — similar to the Furoma Rift decisions. For this guide-maker, I retreated after getting one Howlite so I could build my Ballista, as that's a quick and easy way to help your progress. My second bail-out was after I had 15 mana and 36 Howlite, so I upgraded the tower, the moat, and my ballista before going back in to try to reach the Ruby drop levels of Midnight. The key is to get lots of Howlite and start upgrading as you're able.
Dawn
You've finally made it here — great job! You'll find three mice: the Battering Ram, the Dawn Guardian, and the Monster of the Meteor. The damage mechanics stay the same at first, but each time you miss the Monster, the damage of every mouse in the area goes up by an extra 100% (you'll get an in-game box explaining this).
E.g. the first time you miss the Monster, the damage of both him and the Dawn Guardian goes from 3 points to 6. The next time, 9. Then 12. And don't get me started on the Battering Ram!
These two mice drop Dawn Dust, which is the only way to build the new traps. The Guardian drops one or two Dust, and the Monster drops three to five. You'll need 500 for each trap, so be prepared to be here a while to collect all 1,000. You might get lucky with a bird drop (roughly 5%) or a bolt drop (roughly 10%), which speeds up the process.
Dawn Dust is also used to make Sunshine Cheese — it takes 25 Dawn Dust at the cheese shop to buy one, but it's the only way to get the Heart of the Meteor mouse, so be prepared!
Power play tip — Shielding charms are your friend. They block a red box from happening, which means less damage. E.g. if a red box does 5 damage, you'll only take 3. While that doesn't seem like much during Midnight, at Dawn when you're at 800% damage it's the difference between taking 40 damage without the charm, or 24 with it.
Each catch of the Monster of the Meteor increases how much damage the next FTC will do — regardless of whether it's the Guardian or the Monster, the damage will be the same:
| Catch | Anger level | % Damage | Grey box | Red box |
|---|---|---|---|---|
| 0 | Irritated | 100% | 3 | 5 |
| 1 | Annoyed | 200% | 6 | 10 |
| 2 | Vexed | 300% | 9 | 15 |
| 3 | Irate | 400% | 12 | 20 |
| 4 | Cross | 500% | 15 | 25 |
| 5 | Angry | 600% | 18 | 30 |
| 6 | Maddened | 700% | 21 | 35 |
| 7 | Ranting | 800% | 24 | 40 |
| 8 | Raving | 900% | 27 | 45 |
| 9 | Raging | 1000% | 30 | 50 |
| 10 | Fuming | 1100% | 33 | 55 |
| 11 | Livid | 1200% | 36 | 60 |
| 12 | Infuriated | 1300% | 39 | 65 |
| 13 | Seething | 1400% | 42 | 70 |
| 14 | Frenzied | 1500% | 45 | 75 |
| 15 | Cheesed Off | 1600% | 48 | 80 |
From here on out, the mice are always Cheesed Off, but the damage continues to climb.
New mice
There are 24 new mice in this area, divided into two primary zones — daytime and nighttime — but as night progresses, different waves of mice will attack.
Daytime mice (all weak to Law):
| Mouse | Trap |
|---|---|
| Meteorite Mover Mouse | Law |
| Mining Materials Manager Mouse | Law |
| Hardworking Hauler Mouse | Law |
| Mischievous Meteorite Miner Mouse | Law |
| Meteorite Miner Mouse | Law |
| Meteorite Snacker Mouse | Law |
Nighttime mice (✓ = appears in that phase):
| Mouse | Trap | Twilight | Midnight | Pitch | Utter | First Light | Dawn | Damage |
|---|---|---|---|---|---|---|---|---|
| Nightmancer Mouse | Shadow | ✓ | ✓ | ✓ | ✓ | 3–5 | ||
| Reveling Lycanthrope Mouse | Shadow | ✓ | ✓ | ✓ | ✓ | 3–5 | ||
| Battering Ram Mouse | Both | ✓ | ✓ | ✓ | ✓ | ✓ | ✓ | 15 |
| Night Shift Materials Manager Mouse | Shadow | ✓ | ✓ | ✓ | ✓ | 3–5 | ||
| Mischievous Wereminer Mouse | Shadow | ✓ | ✓ | ✓ | ✓ | 3–5 | ||
| Alpha Weremouse | Shadow | ✓ | ✓ | ✓ | ✓ | 3–5 | ||
| Werehauler Mouse | Shadow | ✓ | ✓ | ✓ | ✓ | 3–5 | ||
| Wereminer Mouse | Shadow | ✓ | ✓ | ✓ | ✓ | 3–5 | ||
| Night Watcher Mouse | Arcane | ✓ | ✓ | ✓ | ✓ | 3–5 | ||
| Wealthy Werewarrior Mouse | Shadow | ✓ | ✓ | ✓ | 3–5 | |||
| Hypnotized Gunslinger Mouse | Arcane | ✓ | ✓ | ✓ | ✓ | 3–5 | ||
| Arcane Summoner Mouse | Arcane | ✓ | ✓ | ✓ | ✓ | 3–5 | ||
| Meteorite Golem Mouse | Arcane | ✓ | ✓ | ✓ | ✓ | 3–5 | ||
| Cursed Taskmaster Mouse | Arcane | ✓ | ✓ | ✓ | 3–5 | |||
| Meteorite Mystic Mouse | Arcane | ✓ | ✓ | ✓ | 3–5 | |||
| Nightfire Mouse | Arcane | ✓ | ✓ | ✓ | 10 | |||
| Dawn Guardian Mouse | Arcane | ✓ | ✓ | 3–350 | ||||
| Monster of the Meteor | Arcane | ✓ | 3–350 |
Some special notes on the new mice:
- Meteorite Mover — Super rare, only found in daytime. Can be caught with Gouda and patience.
- Battering Ram — Use Crescent/Moon Cheese to avoid this beast.
- Nightmancer — Can't be avoided, and an FTC moves you back three hunts! Particularly evil in the Midnight section, being a Shadow mouse when you're likely on an Arcane trap. Upgrade Ballista to level 3 for an auto-catch.
- Wealthy Werewarrior — The only other Shadow mouse in the Arcane section. Evil devs…
- Dawn mice — With each catch of the Monster, all Dawn mice do double the damage. From 3 points to 6, then 9, then 12, then 15, then… yeah. Good luck!
Loot distribution
- Meteorite Pieces — Available anywhere, anytime, day or night.
- Howlite — Plentiful before Pitch Black, but still available afterwards.
- Bloodstone — Plentiful after Pitch Black, but still available afterwards.
- Mana — Pretty rare. You'll see an average of one every four hunts during Pitch Black, so only 2–3 per run-through. With resources, you'll get one every 3 hunts if you use SB+ during daytime, as the Materials Mining Manager drops them. You can also donate — roughly $12 USD equals about 1,000 hunts' worth of mana.
- Animatronic Bird — Available as a Monster loot drop or bought in store for 500 Dawn Dust.
- Silver Bolt — Available as a Monster loot drop or bought in store for 50 Dawn Dust.
Here are my experiences in each area (a small sample size — two full run-throughs from day to dawn):
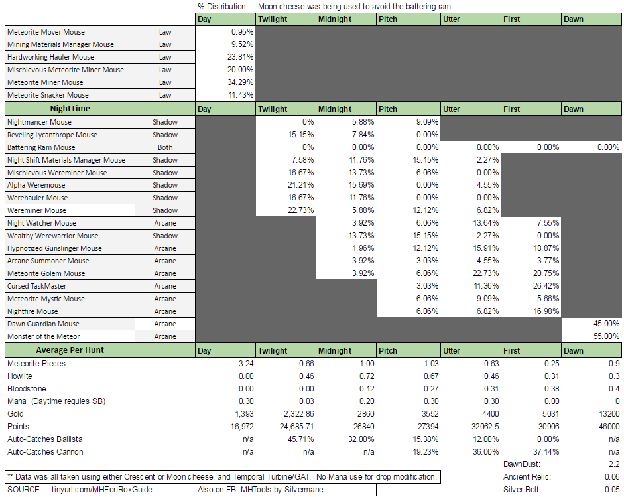
Cheese does seem to make a difference! Here are two HornTracker screens side by side — bird drops and Dawn Dust both tripled when using Moon Cheese:
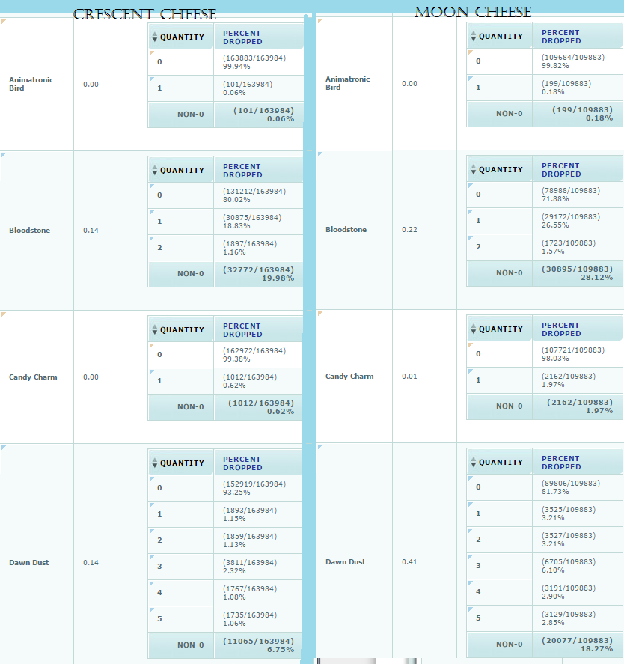
Power play tip — Still stuck on the Battering Ram and just want him once to finish your collection? Finish your run-through to daylight, then use all but two of your meteorite pieces to craft Crescent Cheese. Heal your wall for two points, enter Twilight, and hope you catch him. If you miss, you'll be bumped back to Daytime — do a hunt for a few pieces of meteorite to heal your wall and try again. It's a lot of work, but this method means you're only losing 2–3 meteorite pieces each hunt instead of dozens.
New traps
There are no new bases or skins, but there are three new traps that can be built through the Trapsmith in Fort Rox. Both the Droid ArchMagus and the Interdimensional Crossbow require special items (Animatronic Bird and Silver Bolts, respectively), bought for 500 Dawn Dust each — or, if you've got the DHU, the Monster of the Meteor is known to drop the bird/bolt as loot. You'll also need some Howlite, so don't spend it all converting to mana.
Please remember the new Arcane/Shadow traps are not the most powerful in the game. The Zokor traps are more powerful (and more expensive), and if you were around for Ronza in 2016, the Chrome Arcane is buried in your inventory — and it's better too!
There is also the Meteor Prison Core Trap, the best Law trap in the game. This requires a part from the Heart of the Meteor mouse (see the next section).
Game boost tip — Once you have the traps, Dawn Dust has three uses, in my recommended order: save for future portal crafting (100 Dawn Dust each); craft Sunshine Cheese (25 Dawn Dust each); or buy Bolts/Birds in the store and sell them on the open market.
MouseHunt fun fact — This game can change quickly, and the people who watch it are the ones who get rich. When this guide was first written, the Animatronic Bird sold on the marketplace for 7 million a few days after opening; by 11/11/16 it was down to 2 million; and by 3/22/17 they sold for less than 200,000. True early birds made some nice money!
Treasure chests & the Heart of the Meteor
Treasure chests for Fort Rox were released on March 15, 2017. You'll need to collect two components from these chests — a Portal Core and a Portal Console. Take these plus 100 Dawn Dust to the Fort Rox General Store and buy the Portal Projector, your key to entering the Heart of the Meteor.
With massive DHU, you might do three chests and end up with three Cores. You can also scour the marketplace for a Console. As of this writing there's roughly a 25% chance of a Console/portal from a rare chest, and a 12% chance from the regular chest.
When you reach Dawn, you can activate the portal via the HUD. Note that the portal is destroyed when it opens — it's one-time use! Much like the Tower, once you go in there's no coming back without crafting another, so be sure to have your Sunshine Cheese (25 Dawn Dust each, Cheese Shop) ready to go.
Gameplay tip — This area is like Zugzwang's Tower: once you leave, you'll need to craft a new projector to come back in. The good news is the portal brings you right back where you left off. If you open the portal with 42 wall strength, you'll exit and land right back at Dawn with 42 wall strength!
The Heart of the Meteor mouse is Arcane-weak but pretty strong. Have no fear, though — after nine misses she'll collapse in exhaustion, and your tenth hunt is a near-certain catch. Once you catch her, you'll be sent back to Daylight and your hard-earned Sunshine Cheese will automatically disarm. She'll also drop a Meteoric Core Fragment, which you can take to the Trapsmith for a new Law trap that's nearly double the power of the best one out there.
Gameplay tip — Stock up on Sunshine Cheese before you go in. There's no leaving for more, but anything over 10 is a waste.
TL;DR for the hopelessly lost
- Get the map piece from the CSC Cartographer.
- Enter Fort Rox.
- Build the Wall and Mage Tower as soon as you can.
- Enter Night time. Use Moon Cheese to avoid the Battering Ram.
- Collect as much Howlite as you can.
- Eventually get defeated and go back to daytime.
- Fix the wall using either the upgraded tower or spare pieces.
- Buy any defence upgrades you can with Howlite.
- Repeat steps 4–8 until you can survive until Dawn and face the Monster.
- Obtain 1,000 Dawn Dust and buy the two new traps (500 each), or get lucky drops.
- Buy or earn portal pieces, and buy a portal from the General Store. Open it at Dawn.
- Have 10 Sunshine Cheese ready to attract the new Heart of the Meteor mouse.
- Buy the new Law trap using the Heart mouse's loot.
This guide was written by Steven Cherecwich ("Silvermane"). It is imperfect and incomplete, so you are free to copy and modify as you see fit, but please credit the original.